Posts

IBM RAF: Create a Websphere Application Server restart project

Image
I have been doing consulting work with IBM Rational Automation Framework (old WICA) for a few years now, but never posted anything on it. This is a very basic WAS restart project. The reason for using the Build Forge (BF) web interface and terminology vs. the RAF Client (Eclipse based) is that when building such projects you need to think about your end users. In this case, WAS system administrators, that have no RAF experience. The BF web interface is the appropriate tool for external customers, easy to access and use without having to install the RAF Client. The RAF Client has its strengths and limitations and in my opinion it should be used only by the experienced RAF developer or user. 1. Create RAF Project 1.1 Login into BF/RAF web interface 1.2 Go to Console tab and click on Projects. 1.3 Enter a Name for your project and click Save:     1.4 Go to Console tab and click on Projects.  1.5 Click on newly created FEP_SERVER_RESTART_DEMO   1.6 Create ...
Creating a Custom WebSphere Portal 8 Theme with the Eclipse IDE

This is a very good IBM article on how to get started with your own custom theme for WebSphere Portal 8:  Deploying and developing IBM WebSphere Portal 8 themes: A step-by-step guide A couple of notes: While the article is mentioning RAD as a preffered tool, I was successfully able to use Eclipse IDE (with the WAS 8 server connector plugin provided by IBM).  I was working on Linux and I used the command line to mount the WebDAV shares ( WebDav Client on Linux ). You can also use Nautilus to connect to the WebDAV shares. 

Creating Portlets without RAD (IBM WebSphere Portal 8)

Image
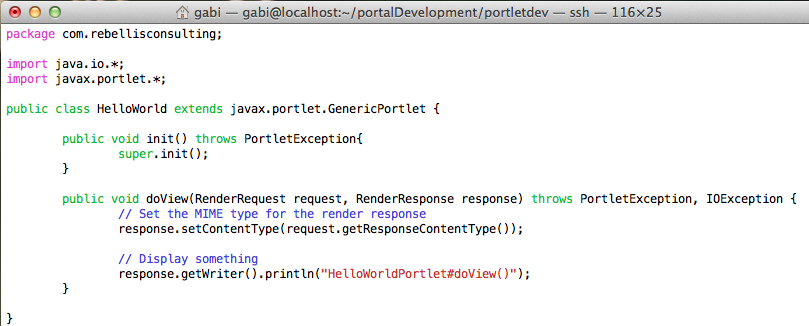
This question comes up a lot... Is there any way to create portlets for IBM WebSphere Portal if I do not have RAD available?  Rational Application Developer is the IDE of choice for IBM WebSphere Portal developers. There are a lot of advantages of using RAD for portal development (see link above for tech specs). There is a 30 days trial available for download if you would like to try it and great news for all the Apple fans:), it now works on Mac OS. However, IBM is showing you how to create a portlet form the command line:  Creating a simple portlet . Compiling would require a few Portal libraries. So if you have a portal install available and would like to give it a try, follow the following steps. This is a cheat sheet to the already existing IBM documentation above: Note: I am assuming that you are on Linux machine and there is a Portal v8 installed. Hard core portal developers that do not need all the bell and whistles of RAD can use the light weight...

WebDav Client on Linux

"Web Distributed Authoring and Versioning (WebDAV), an extension to the HTTP-protocol, allows authoring of resources on a remote web server. davfs2 provides the ability to access such resources like a typical filesystem, allowing for use by standard applications with no built-in support for WebDAV." (http://savannah.nongnu.org/projects/davfs2) While working on IBM WebSphere Portal 8 theme customization, I had a few issues copying and pasting from Nautilus builtin webdav client (Centos). This is the easy way of mounting a webdav share from the command line.   1. Install davfs2           sudo yum install davfs2 2. Mount remote resource (you might be prompted for credentials)           sudo mount -t davfs http://localhost:8000/webdav  /mnt/dav 3. Access the remote resource locally in /mnt/dav directory.

REST CRUD Back-end Services in Seconds Without Writing One Line of Code

Create a Services Back-end in seconds with Node.js and Sails MVC Frameowrk Scenario: You are a front-end developer that would like to test your newly developed user interface, by pointing to some real back end services. In today enterprise world, this can be a very time consuming and expensive challenge. Depending on your company structure, you might have to involve your management for approvals, procurement, and also the infrastructure, security, networking, back-end development, database teams, etc. But all you need is some back-end service that can allow you to insert and retrieve some data, without wasting a month to get it accomplished. This is how can you get it done without writing one line of code. On your local machine or a development server (linux, mac os, windows): 1. Install node.js (http://nodejs.org/) sudo yum install nodejs npm 2. Install sails (http://sailsjs.org/) sudo npm -g install sails 3. Create new Sails Project sails new TestBackend 4. ...

Installing IBM WebSphere Portal 8 on Fedora 19

The only issue I had was related to the OS prerequisites not being met. All I had to do was temporarily update the /etc/redhat-release to  Red Hat Enterprise Linux Server release 5.9 (Tikanga) Let me know if you are trying to install IBM WebSphere Portal 8 on Fedora 19 (or any other Fedora version) and run into any other issues. Good luck:) 

Adding more disk space to your existing Amazon EC2 Instance

1. Login into your EC2 console. 2. Stop your instance. 2. Go to Volumes. 3. Click on Create Volume button on top right. and follow directions to create a new volume. 4. Select check box next to volume and from Actions menu select Attach Volume. 5. Attach it to your desired instance. 6. Start your instance. 7. Connect via ssh and run fdisk -l. This will list all the attached devices. Take note of the new device i.e. /dev/xvdj. NOTE: On Fedora 19 instance, fdisk -l might not display the mounted volume. Look in your EC2 console and get the correct volume name and then replace s with xv: i.e  /dev/xvd* instead of /dev/sd*. 8. Format your device (Optional): i.e. sudo mkfs -t ext3 /dev/xvdj 9. Create a new directory: i.e. sudo mkdir /myMedia 10. Mount the device: i.e. sudo mount /dev/xvdj /myMedia 11. Note: To permanently add your volume edit your fstab.  

Node.js RESTful CRUD (Express & MongoDB)

/* Server */ //Import Express Framework. Install: npm install express var express = require ( 'express' ); var app = express (); /*bodyParser Parses the contents of the request body. */ app . use ( express . bodyParser ()); /* methodOverride: works with bodyParser and provides DELETE and PUT methods along with POST. You can use app.put() and app.delete() rather than detecting the user’s intention from app.post(). This enables proper RESTful application design. However the form/request will require a hidden input _method that can be put or delete*/ app . use ( express . methodOverride ()); /* Database */ var mongoose = require ( 'mongoose' ); //Import MongoDb 'driver'.Install: npm install mongoose mongoose . connect ( 'mongodb://localhost/bookmarks' ); var Schema = mongoose . Schema ; var ObjectId = Schema . ObjectId ; /* Models */ var Bookmark = new Schema ({ name : { type : String , required : true , trim ...

Tired of GitHub? Stay tuned for RocketGit!

RocketGit will be release soon and it will be the new kid on the block. Rocketgit is neat web interface for git focusing on simplicity and usability. It enables teams to work together on software projects. Its integration with the Eclipse IDE is smooth, the documentation is short and sweet, the interface is clean and simple but very efficient and effective. Stay tuned!

RocketGit #7: Eclipse IDE: Generate SSH Key (Windows)

GENERATE SSH KEY 1. In Eclipse, navigate to:           Window --> Preferences --> General --> Network Connections --> SSH2 2. Go to the Key Management tab. 3. Click on Generate RSA Key... button. 4. Enter a Passphrase and confirm it. 5. Click on Save Private Key... and specify a name (i.e. rocketgit_rsa) IMPORT SSH KEY IN ROCKETGIT 1. In Eclipse, navigate to:           Window --> Preferences --> General --> Network Connections --> SSH2 2. Go to the Key Management tab. 3. Click on Load Existing Key... button. 4. Select the SSH key file (i.e. rocketgit_rsa) created in the previous steps. You will have to specify the passphrase. 5. Once the key was loaded, select and copy everything in the main box label above " You can paste this public key into the remote authorized_keys file: " 6. Login into RocketGit. 7. Go to Personal --> SSH Keys ...

RocketGit #6: Integration with Eclipse IDE

Image
1. Install Eclipse IDE and Git Plugin (EGIT). 2. Clone a remote git repository in Eclipse: File --> Import -->  Git --> Projects from Git --> URI 3. Copy and paste the ssh://... link of your git repository into the URI field. (Everything else will be pre-populated) 4. Click Next. You will be prompted to enter the SSH key passphrase. 5. The master branch will be listed, select and click Next. 6. Specify a Local Destination directory for your repository and click Next. 7. Import in Eclipse (you have three options: (a) import an existing Eclipse project, (b) use new project wizard, (c) import as a general project) NOTE: I chosed option (a) since my repository is already an existing Eclipse project. Click Next and then Finish. 8. Your Eclipse project was imported in your local workspace.